
Ummm...I'm back?!?! Well, was I ever really here?
I haven't posted in almost 2 years!! Don't worry, I have not STOPPED crafting, I just haven't been POSTING. I guess life just got the better of me but I'm working on it now and looking forward to posting about all of the projects I have planned.
I have been wanting a set of cute salt and pepper shakers for FOREVER! I wanted a modern and glam yet cute and girly set. After doing a lot of searching, pinning and saving items to all of my various shopping carts, I landed on these beauts from Kate Spade.
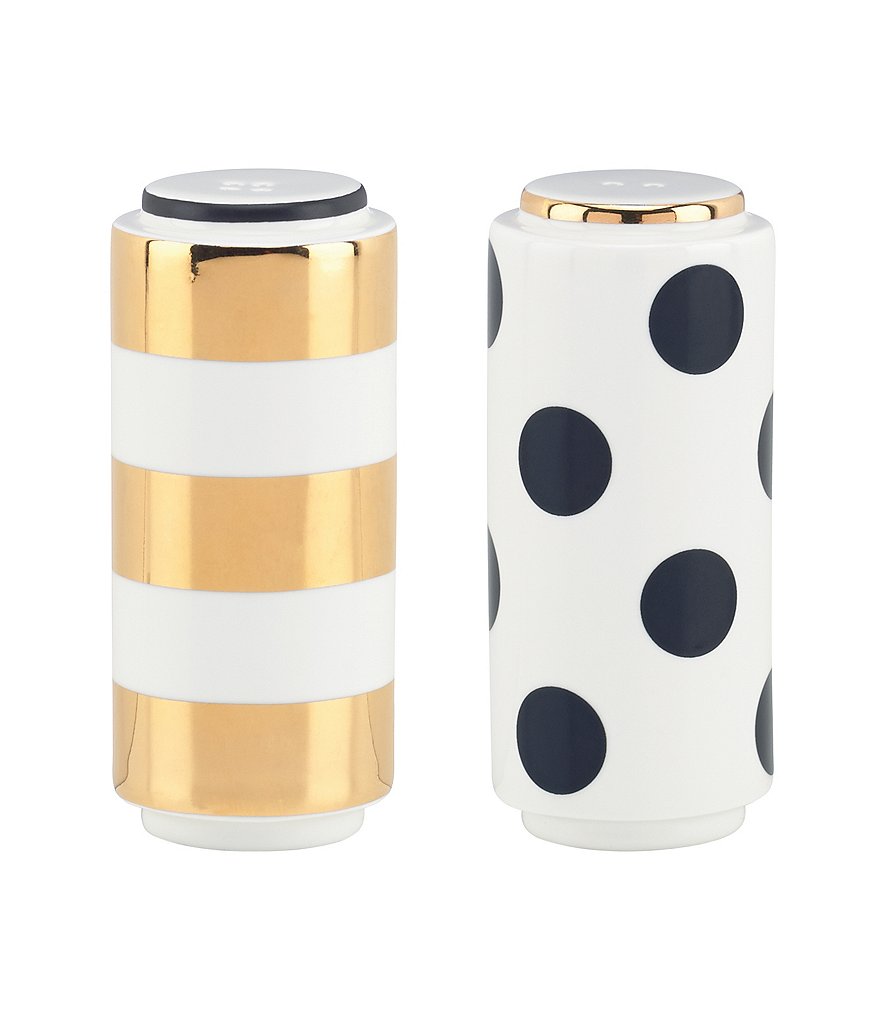
I am slowly working on my interior decor and I have a long term vision in mind for my table setting. I want to infuse more colour in other parts of the table and surrounding decor, so I decided that I wanted simple white and copper shakers instead of the black and white as seen on the Kate Spade version. I toyed with the idea of spray paint, but I ended up choosing Con-Tact paper instead. I'm hoping to do all my spray painting projects at once in the Spring but I wanted to get these done now since it's been on my to-do list for so long.
In short, the process is simple:
- order supplies (Bronze Con-Tact paper here, Porcelain Salt & Pepper Shakers here)
- cut paper into desired shapes
- stick the paper onto shakers
How did it work in reality? Scroll down to find out. Spoiler alert: it was SLOPPY.
 |
| supplies (scissors not shown) |
 |
| cut strips of Con-Tact paper along the gridlines (no measuring, yay!) |
 |
| stick strips onto shaker (I eyeballed, but feel free to measure and mark off if you want) |
 |
| trim excess paper off (don't run the blade against your fingers like I did) |
 |
| ta da! one down, one to go. |
 |
| cut squares/diamonds by cutting along the gridlines |
 |
| cut into triangles by cutting the squares/diamonds in half, diagonally (not pictured) |
 |
| stick paper onto the shaker in your desired pattern (I eyeballed it, you can measure if it makes you feel better) |

So...the reality of it was that I failed about 3 times before I finally figured out what to do.
I tried horizontal stripes....that didn't work because the Con-Tact paper didn't lay flat. It's probably a combination of the shaker not being perfectly round and flat and me not laying the paper out perfectly. I settled for vertical stripes.
I tried polka dots...that didn't work because the hole punch couldn't punch through the paper cleanly. I tired sharpening the hole punch with foil...but it still didn't work. I gave up on this idea.
I tried a pattern of diamonds since the polka dots failed...that didn't work. It just didn't look great. It wasn't awful but I definitely did not love it. I decided to cut the diamonds in half, into triangles, and it worked!

Bonus #1: the Con-Tact Paper peels off very easily if I pick at it so if I want to change it, I can do so with minimal effort. I love that I don't have to commit for the long term..the pressure of making a bad long term decision is haunting!
Bonus #2: this was an insanely inexpensive project. The plain S&P shakers cost $5.50 and I used a very minimal amount of Con-Tact paper, which I purchased to do a number of different projects anyways.
Thoughts?
Sarah
No comments:
Post a Comment